These are the steps I used to upgrade a Juniper vSRX cluster with minimal downtime. The Juniper vSRX cluster was running on ESXi, the upgrade was from 15.1X49-D120.3 to 17.4R1. The upgrade was done to get some new features for the user firewall (IPv6 support).
The basic cluster upgrade process is like this:
- Copy the upgrade file to both nodes in the cluster.
- Prepare the cluster for the upgrade – to keep things easy I made sure that
node0was the active node for all redundancy groups. node1has all interfaces disconnected so that it goes offline.node1is upgraded and rebooted.node1is checked to make sure the upgrade is successful.node0has all interfaces disconnected andnode1has all interfaces connected. This will move all traffic tonode1but it will cause a short outage.node0is upgraded and rebooted.node0is checked to make sure the upgrade is successful.node0has all interfaces enabled and it will join the cluster again.- A full IDP update is done for both nodes.
As the vSRX firewalls are a VM, I highly recommend that you take a snapshot of the VM before proceeding with the upgrade. If something gets messed up you can roll back the snapshot and restore everything how it wasa without having to do a complete reinstall which can be a pain.
Most of the instructions where taken from Juniper KB17947.
Preparation
- Check the cluster status and make sure that
node0is primary for all redundancy groups. Useshow chassis cluster statusto check, the output for my cluster is like this:
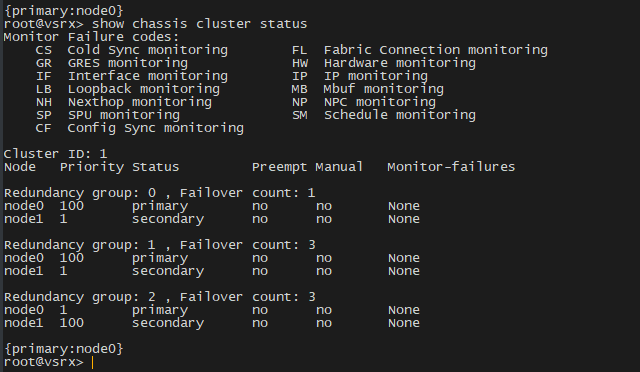
For any redundancy groups that node0 is not primary for, do a takeover to make it the primary (use request chassis cluster failover redundancy-group X node 0 and replace X with the redundancy group ID).
2. Download a copy of the upgrade file from the Juniper website. The file in this case was named “junos-vsrx-x86-64-17.4R1.16.tgz”.
3. Make sure there is enough disk space available in the /var file system. Use show system storage, the output from mine had this:
/dev/vtbd1s1f 2.7G 280M 2.2G 11% /var
If there is not enough space for the upgrade, try running request system storage cleanup to free up some space. You can also refer to this document for removing files on a SRX device.
4. Upload the upgrade image to /var/crash/corefiles using scp/sftp. Alternatively, you could just download the image directly from the Juniper site, but I like to download it elsewhere then copy it so future upgrades are quicker.
5. Once the upgrade image has been copied, verify the MD5/SHA1 matches the hash on the download page on the Juniper site.
6. Copy the upgrade image from node0 to node1 (this will take a long time, it is normal): file copy /var/crash/corefiles/junos-vsrx-x86-64-17.4R1.16.tgz node1:/var/crash/corefiles/
You now have the upgrade image on both nodes, node0 is the primary for all redundancy groups and the upgrade can proceed.
Upgrade node1
The standby node will be upgraded first. I recommend that you have a snapshot of the node pre-upgrade to ensure you can roll back easily if you have issues.
- This step is critical to your cluster still functioning during the upgrade! Edit the VM settings for the vSRX node
node1and disconnect all interfaces. Since I am using VMWare I also disabled the option for the interfaces to connect on boot just in case. This will makenode0think thatnode1is offline. When you log in tonode1it will thing it is primary which is normal, since all interfaces are disconnected it obviously isn’t primary in the cluster really. - Connect to the console for
node1and upgrade the system software:request system software add no-validate no-copy /var/crash/corefiles/junos-vsrx-x86-64-17.4R1.16.tgzYou must use theno-validateoption for the upgrade to proceed. - After the upgrade has completed, reboot it by issuing
request system reboot - Once the node has rebooted log in to it again and make sure that you can run basic show commands and things look alright.
The upgrade process for node1 is complete. Do not reconnect the interfaces at this stage.
It is critical that you check the server to make sure your interfaces have come up. Make sure that you can see the “ge-” interfaces before continuing, if you cannot see those interfaces no traffic will be working through the router (this means the FPC is not starting usually). I had this issue and simply doing an additional reboot fixed it.
Upgrade node0
The live cluster primary node can now be upgraded. The upgrade process for this node involves disconnecting all interfaces on node0 and connecting all interfaces on node1 – this means you WILL have an outage which should be quite short. As with the upgrade for node1 I highly recommend you have a snapshot of the VM to roll back to if you have issues.
- Edit the VM settings for
node0and disconnect all interfaces. - Edit the VM settings for
node1and connect all interfaces that you disconnected previously during thenode1upgrade process. - Verify that all traffic is working correctly via
node1, routing protocols have come up if you use them and so on. You must be certain everything works otherwise you will have a bad outage if you continue (you will most likely have to roll back the snapshot!). Also check the cluster status withshow chassis cluster statusto make sure thatnode1is primary for all redundancy groups. - Log into the console for
node0and issue the software upgrade command:request system software add no-validate no-copy /var/crash/corefiles/junos-vsrx-x86-64-17.4R1.16.tgz - After the upgrade has completed, reboot it by issuing
request system reboot - Log in to the console again for the VM and make sure that basic show commands work and the configuration looks fine.
- Optional but recommended: shut down
node0withrequest system power-off. This is so when the interfaces are enabled the chassis cluster doesn’t get confused and try and move tonode0as the primary. - Edit the VM settings and connect all interfaces for
node0. If you powered offnode0, power it back on now.
node0 should be back up and running and your cluster should be healthy again.
IDP Update
After the upgrade for the JunOS software is complete a full IDP update is required.
- Issue a full update download request:
request security idp security-package download full-update - Monitor the download/copy status with
request security idp security-package download status - Once the download is complete, install the full update with
request security idp security-package install
Potential Issues
Disk Space
A vSRX cluster that was upgraded to 17.4R1 from 15.1 was then failing to be upgraded to 18.1R1. During the update install I was getting errors like this:
/bin/cp: error writing '/recovery/images/install-media-srx-mr-vsrx-18.1R1.9.tgz': No space left on device
...
gzip: stdin: unexpected end of file
tar: Unexpected EOF in archive
...
ERROR: Host Upgrade failed!
ERROR: upgrade failed
ERROR: Failed to add junos-vsrx-x86-64-18.1R1.9.tgz
I had already ran request system storage cleanup to remove old log files as well as trying to delete various cached files and other large files that are safe to delete. I couldn’t get the upgrade to work no matter what I did so I ended up deploying a new pair of VM’s.